
It took a while for the manufacturers in the vaping industry to develop a refillable pod system good enough to compete with the pre-filled devices sold in the convenience stores, but it finally happened with the release of the original Uwell Caliburn in 2018. The Caliburn featured the perfect balance of simplicity, flavor quality, vapor production and low cost, making it the perfect choice for anyone who owned a vaping device with pre-filled pods and was looking for a worthy upgrade.
When a manufacturer releases a successful vaping device, it’s a great thing for the manufacturer and the vaping community. Almost immediately, though, everyone started asking the same question: What’s next? With pod vaping technology advancing rapidly, would it be possible for Uwell to follow up their success with another device that was a worthy successor to the original Caliburn?
Now, we finally have our answer. The Uwell Caliburn G is an ideal pod vaping system in every way. In this review, we’ll walk you through the features of Uwell’s new device, and we’ll also explain the most important aspects of learning how to use it.
If you haven’t ordered the Uwell Caliburn G yet, don’t wait! We have it right here at Vape Juice for just $24.95. Grab yours now!
What Is the Uwell Caliburn G?
The Uwell Caliburn G is an updated version of the original Uwell Caliburn that looks similar to the original Caliburn but is actually better in every way. Like the original Caliburn, the Caliburn G is a pen-shaped pod-based vaping device with a dual-mode firing function that allows it to generate vapor when you inhale or hold the fire button. That, however, is where the similarities end because the Caliburn G features a host of improvements that make it completely unique among Uwell’s product lineup. Here are some of the Caliburn G’s most significant improvements.
- An updated design makes the Caliburn G look significantly more modern than its predecessor.
- A redesigned pod makes it possible for you to keep your existing pod and replace just the atomizer coil rather than discarding the entire pod after a few days of vaping when the flavor begins to change. The replaceable coil system makes the Caliburn G significantly less expensive than the original Caliburn to own over the long term, and it also allows the Caliburn G to be an equally effective vaping device regardless of whether you prefer the mouth-to-lung or direct-to-lung inhaling style.
- Speaking of adapting itself for any inhaling style, the Caliburn G also has a simple adjustable airflow system that you are absolutely going to love. To switch between the high- and low-airflow settings, all that you need to do is reverse the orientation of the pod. Use the low setting for a great mouth-to-lung vape. If you prefer bigger clouds, switch to the high setting for a restricted direct-to-lung hit.
- The Caliburn G is significantly improved from a power management standpoint. Although it’s about the same size as the original Caliburn, it has a higher battery capacity of 690 mAh – and thanks to the built-in USB-C port, it also charges more quickly. If you haven’t owned a USB-C vaping device yet, you’ll love how much easier it is to connect the charging cable since there’s no need to worry about whether the cable is oriented correctly.
- With an improved battery, it’s only logical that the Uwell Caliburn G should also be superior to its predecessor in terms of power delivery. The Caliburn G finally adds mesh coils to the famed Uwell Caliburn product line. If you know anything about the benefits of mesh coils, you know that using a mesh coil means that you’ll enjoy bigger vapor clouds and more vivid flavors along with instant heat-up times and virtually no popping noises when you vape.
- Since the Caliburn G is a sub-ohm vaping device, it offers a slightly higher operational wattage than the original Caliburn and runs at up to 18 watts.
- The designers of the Uwell Caliburn G have done an excellent job of ensuring that the device is virtually leakproof. Unlike many vape pods, the Caliburn G pod fills from the top, which makes it almost impossible for the pod to leak when it faces up. The Caliburn G pod also features a silicone check valve to ensure that e-liquid can only flow in one direction.
How to Use the Uwell Caliburn G
Now that you’ve read the first part of this guide, you understand what makes the Uwell Caliburn G so special. If you’re in the market for an excellent small pod vaping system, you will probably not find a better one than the Caliburn G right now – and while you wait for your new device to arrive, we’ve got your back with this short Uwell Caliburn G instruction manual. While you’ll still want to sit down with the full printed manual at some point, it’s a lot more fun to do that when your new device is already up and running.
To use the Uwell Caliburn G, you need to know how to do four things. You need to know how to charge the device, how to fill the pod, how to replace the coil and how to vape. You’re about to learn how to do all of those things.
How to Charge the Uwell Caliburn G
To charge the Uwell Caliburn G, connect it to your computer using the included USB-C cable. The charging port for the Caliburn G is on the bottom of the device. As with any vaping device, you should always charge the Uwell Caliburn G with your computer and avoid using the wall adapter for a mobile phone or tablet. Wall adapters for mobile devices use higher-speed charging currents that most vaping devices can’t support. If you try to charge the Caliburn G with a mobile device charger, the battery could potentially overheat. When the device’s indicator light is solid green, the charge cycle is complete.
How to Fill the Uwell Caliburn G Pod

One of the fun things about the Uwell Caliburn G is that, since the filling port is on the top, you can actually fill the pod without removing it from the device. To fill the pod, wiggle the plastic mouthpiece gently until it comes loose. The bottom of the pod will stay inside the device. You’ll see the filling port slightly offset from the pod’s center air channel. Place the nozzle of your e-liquid bottle inside the filling hole and squeeze until the pod is almost full, making sure to leave a little room for air at the top. Replace the mouthpiece. If you’re using the Uwell Caliburn G for the first time or have just replaced the coil, let the pod stand for five minutes before vaping.
How to Replace the Uwell Caliburn G Coil
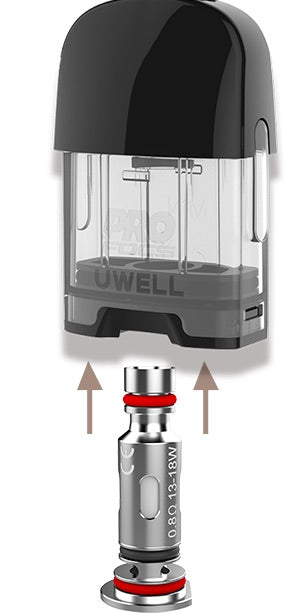
Since you install the Uwell Caliburn G coil through the bottom of the pod, you’ll need to remove the pod from the device to replace the coil. Pull the pod straight up to remove it from the device. Invert the pod, and you’ll see the cylindrical atomizer coil on the bottom. Pull the current coil out and push in the replacement coil. Refill the pod and reinstall it in the Uwell Caliburn G.
In general, you can expect your Uwell Calburn G coils to last several days each. As you use the coil, you’ll find that the flavor changes over time. At first, you’ll detect a sort of exaggerated sweetness. As you continue to use the coil, you’ll start to taste a caramelized flavor. Finally, you’ll start to detect off-putting burned notes when vaping. At that point, the coil is completely burned out, and it’s time to replace it. To maximize the life of your Uwell Caliburn G coils, you should try to use only unsweetened e-liquid. Sucralose is the most popular e-liquid sweetener, and it creates a residue when heated that shortens coil life.
How to Vape With the Uwell Caliburn G
After you’ve charged the battery and filled the pod, it’s time to start vaping with the Uwell Caliburn G – and as you might expect given how simple everything else about this device, vaping is an absolute breeze. You’ve got two options here. If you’d like an experience that feels a bit more like smoking a cigarette, you’ll want to use the automatic firing option. Simply puff on the mouthpiece, and it’ll create vapor automatically.
If you want to get bigger vapor clouds out of the Uwell Caliburn G, you’ll want to use the manual firing option. To do that, press and hold the fire button before inhaling. If you’ve tried both firing methods, you’ve probably noticed that the automatic firing method introduces a split-second delay before the device starts to create vapor. That’s why the Caliburn G also has a manual fire button; holding the fire button eliminates the delay. Although using the manual vaping mode makes the Caliburn G feel less like a real cigarette, it also allows the device to produce significantly bigger vapor clouds.