Have you ever experienced a situation where you got a burned taste from your vape tank even though you were using a new coil? That’s an almost sure sign of a burned wick, and a burned wick is one of the most unfortunate things that can happen to you as a vaper because it means that the coil is ruined. A burned wick – even if it’s just a tiny dark spot – causes a coil to produce a horrible burned flavor, and absolutely nothing can make the coil normal again. You can clean the coil completely, but burned cotton is burned forever.
You need to do two things to prevent a burned flavor when vaping. First, you need to prime the coil and install it properly. Replacing a vape coil the right way helps to ensure that you won’t burn the wick with the first puff, which is what’s happening if you’re getting a burned taste with a new coil. Next, you need to treat the coil properly as you continue to use it. Learn more about how to make vape coils last longer. In this article, we’re going to cover the first part of that equation by explaining how to install a new vape coil the right way. Let’s begin!
These Are the Vape Tanks with the Most Advanced Coils
Getting the maximum possible coil life out of a vape tank is partially a matter of treating your coils properly, which is a big part of why it's so valuable to know how to prime and install your coils. The other important aspect of coil longevity, though, is using a vape tank with coils that are engineered for long life. Here are the vape tanks that have the best coil life on the market today.
- SMOK T-Air: If you want your vape coils to last as long as they possibly can, the most important thing that you can do is use a tank with a mesh coil. That's true of the SMOK T-Air. Another important quality is that the tank needs to have balanced airflow for the vapor production it offers. That's exactly what you'll get with the SMOK T-Air, which uses top airflow vents. The top vents deliver a smooth stream of air to keep the coil cool and prevent it from overheating even during your longer vaping sessions.
- Geekvape Zeus Z Max: This is another tank with a top airflow configuration, which is excellent for coil life. The Zeus Z Max has just about the smoothest airflow of any tank we've ever tested. It's designed to work with Geekvape M Series coils, which are extra wide and stuffed with plenty of wicking material to ensure full saturation and prevent the coil from drying out during long puffs.
- Freemax Gemm Disposable: If you're tired of tinkering endlessly with your coils to get them to last longer, maybe it's time to try a tank that eliminates the issue entirely. The Freemax Gemm is a disposable vape tank that's sold in packs of two for about the same price that you'd normally pay for a box of replacement coils. Just use the tank until you're no longer happy with the flavor and discard it. These tanks are no slouches in the vapor production department. Try the quad-coil version for some truly impressive clouds.
Why Is Priming a New Vape Coil So Important?

One way to understand why priming a vape coil is important is by dropping a cotton ball in a glass of water. You’ll find that the cotton ball doesn’t become saturated with water instantly. In fact, the ball will float for several seconds before finally beginning to sink. That’s because air is trapped between the individual fibers of the cotton ball. Therefore, you have to wait for water to replace the air before the ball will begin to sink.
Alternatively, you can simply push the cotton ball down to saturate it with water almost instantly.
Effectively, that’s what you’re doing when you prime a vape coil.
Priming a coil forces the e-liquid to replace the air trapped in the coil’s cotton wick. Priming the coil helps to eliminate the possibility of vaping before the wick is completely wet, which is important because vaping with a dry wick is what ruins coils.
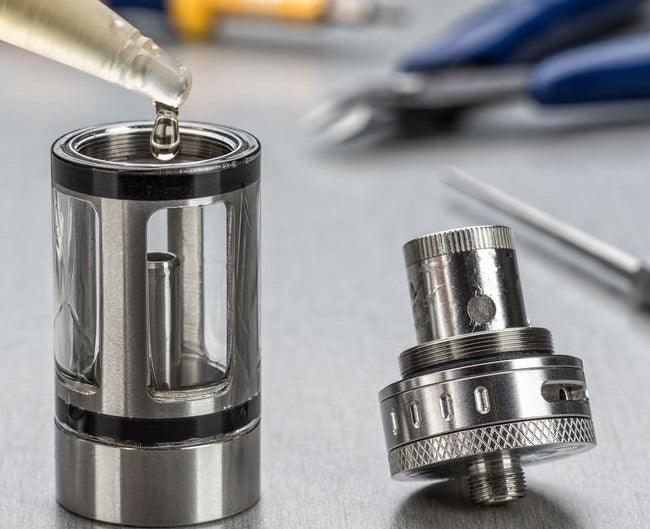
How to Prime a Vape Coil
Priming a coil is so incredibly easy that you’ll wonder why you haven’t always done it. Sure, it’s possible to vape with a new coil without burning the wick even if you haven’t primed the coil yet – but priming a vape coil properly ensures that burning the wick with your first puff is almost impossible. All it takes is a few extra seconds of effort, and the payoff is a much longer-lasting coil – not to mention a whole lot of money saved.
Priming a vape coil is unbelievably simple. To do it, just remove the coil from its package and put a drop of vape juice on each of the wick openings on the side of the coil. With many coils, you can also see the top of the wick if you look down through the center of the coil. If that’s true of the coil you’re using, send a bit of e-liquid through the top of the coil as well. If the wick still looks dry after you’ve done that, continue adding e-liquid until the entire wick looks damp.
That’s it – you’ve primed your coil. The wick isn’t completely saturated with e-liquid at this point, but you’ve displaced enough of the air in the cotton that simply installing the coil and filling the tank should do the rest. The coil should give you great performance from the very first puff as long as you install it properly, and that’s what we’re going to discuss next.
How to Install a Vape Coil
If you’re replacing the coil in an existing vape tank rather than preparing a new tank for its first use, you need to take a moment to clean the tank. Flavor is everything in vaping, and the only way to get the best possible flavor out of a new coil is by making sure that your tank is clean before installing the coil. After removing the old coil from your tank and throwing it away, disassemble the tank and rinse it thoroughly in your sink. A quick rinse is all that’s necessary to remove the old e-liquid and pocket lint that can harm the tank’s flavor and reduce airflow. If you rinse your tank every time you replace your coil, you’ll never have to worry about giving the tank a deeper cleaning because grime and residue will never have a chance to build up.
After rinsing the tank, dry it thoroughly with paper towels. You don’t want any water to remain trapped in the tank – especially in the base of the tank – because that can hamper the flow of power from the vaping device to the atomizer coil.
When you’ve finished drying the tank, it’s time to install the primed coil by twisting it into the base of the tank and then reassembling the tank. Fill the tank almost all the way to the top, but always remember to leave a little room for air at the top of the tank when filling it. When you draw air through a vape tank, a partial vacuum forms inside the tank’s enclosure, and that helps to prevent it from leaking. For that to happen, there needs to be a little empty space in the tank. Overfilling the tank can cause it to leak.
At this point, your tank is ready to go. You’ve got a tank that’s cleaned and filled, and you’ve installed a coil that’s new and properly primed. What’s left to do? Before you start vaping, you should wait at least five minutes for the e-liquid in the tank to work its way into any dry spots that might remain in the wick.
Finally, before you start vaping, it’s wise to lower the wattage of your vaping device to slightly below the wattage at which you normally vape. That way, if the wick does happen to have a dry spot, you should notice that the flavor isn’t quite right. Hopefully, you’ll release the fire button and stop vaping before the wick burns. Wait a few minutes and try vaping again. If the flavor is what it should be, you can start slowly ramping up the power until you reach your target wattage. Your coil is fully broken in now, and if you treat it right, it should be quite some time before you need to replace it again.
Burned Taste With a New Coil? How to Identify a Burned Wick
A burned wick is one of the worst things that can happen when you vape, because it instantly and permanently ruins a coil’s flavor. Reading this article, you’ve learned how to prime and install a new vape coil, and with that knowledge, you should never again have to worry about experiencing a burned flavor with a new coil.
Let’s suppose, though, that you are getting a burned flavor with a new coil. You thought that you followed the instructions in this article to a T, but the flavor still doesn’t seem quite right. There is a way to find out for sure if you’ve burned the wick in your coil. Doing this does require disassembling the coil – which will make it unusable – but if you’re going to replace the coil anyway, it might be helpful for you to find out what’s going on. If you’re consistently burning your coils’ wicks, it most likely means that you aren’t priming your coils properly or aren’t waiting long enough for the wick to become saturated after installing the coil. It can also mean that your vaping wattage is too high.
To find out if you’ve burned your coil’s wick, start by disassembling and rinsing the tank. Since you’ll be handling the coil, you want to rinse away as much of the e-liquid as you can to prevent the nicotine from absorbing through your skin.
Next, take the coil and remove the metal plug from the bottom. Although the bottom of the coil may appear solid, the post at the bottom actually has a removable cap that holds the coil’s wire leads in place. When you remove the cap, you’ll see a rubber ring that separates the coil’s positive and negative leads. You can remove that as well.
With the cap and ring removed, you can pull the entire coil assembly and wick through the large opening at the top of the coil’s metal case. You can do that by pushing the leads sticking out of the bottom of the coil or by pushing the coil assembly and wick up with a thin object. Once the coil assembly begins to stick out of the top of the coil’s casing, you can grab it and pull it the rest of the way with your fingers.
Once you’ve removed the coil assembly, unwrap the cotton wick and examine it. If the wick has a dark spot, it’s burned. If you’re sensitive to burned flavors, even the tiniest dark spot will noticeably change the flavor that you experience when you vape.