
If 2019 and 2020 were the years of the pod vaping system, 2021 is shaping up to be the year of the pod mod. All around the world, vapers who have been using pod systems for the past few years are ready to upgrade. They love pod systems, and they don’t want to switch to traditional mods – they want to buy more powerful pod-based devices. The manufacturers of vaping products, meanwhile, are only too happy to serve that need. A pod system, after all, is traditionally a proprietary device that only works with the pods and coils made by that device’s manufacturer. The fact that they’re proprietary means that pod systems are even more profitable for their manufacturers than traditional mods; once you buy a pod-based device, you’re locked into that ecosystem unless you buy a different device.
With a mod, meanwhile, there’s a chance that the manufacturer of that device will only earn money from you once, because you might use the device with a tank made by another company.
The Lost Vape Ursa Quest is something different because it’s one of only a few pod-based devices in the world that doesn’t lock you into a single ecosystem. If you’d rather use a different 510-threaded tank or atomizer, you’re free to do so. This is truly a pod mod that can do anything.
Are you still shopping for your next pod system? Grab the Lost Vape Ursa Quest right here from Vape Juice for just $73.95.
If you haven’t chosen your next vaping device – or you’ve already ordered the Lost Vape Ursa Quest and are waiting for it to arrive – this is the page for you. In this Lost Vape Ursa Quest instruction manual, we’ll describe the most important aspects of using this revolutionary new pod mod. We’ll also explain the features that make the Ursa Quest so special.
What’s Special About the Lost Vape Ursa Quest?
So, what makes the Lost Vape Ursa Quest different from other pod systems, and what makes it worth your money? These are just a few of the features that have helped the Ursa Quest get so much attention from the vaping community.
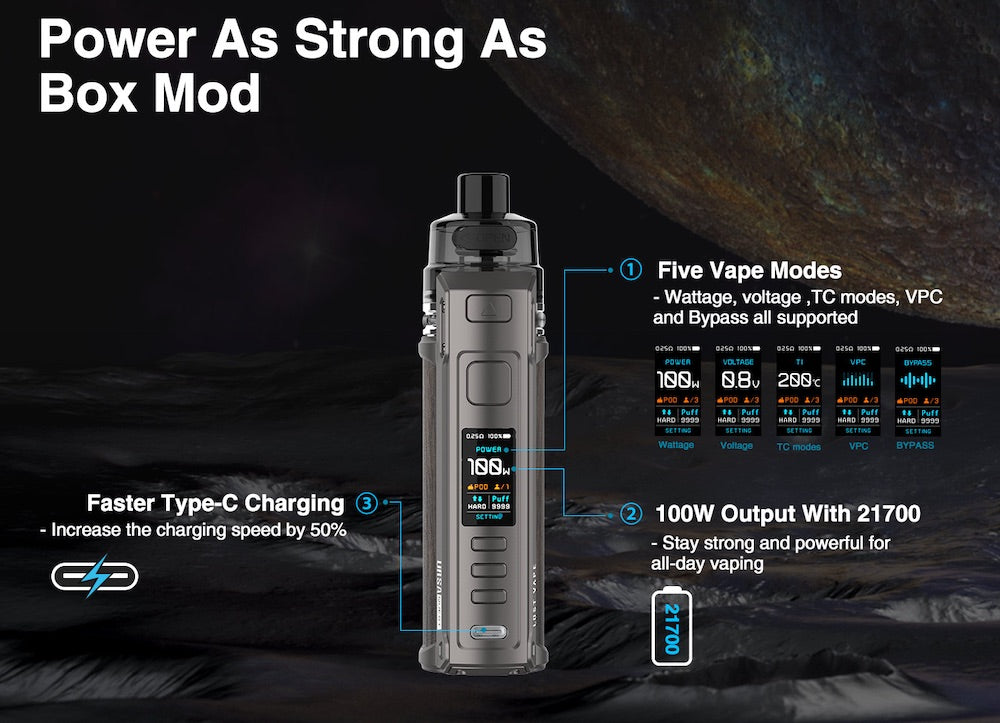
- Achieves a 100-watt power range and exceptional vaping time with a single 21700 battery. You can remove the battery for charging in an external charger. Also works with 20700 and 18650 batteries.
- Supports all of the vaping modes that you’d expect to see in a full-featured box mod, including wattage mode, voltage mode, power curve mode, temperature control mode and bypass mode.
- Not a fully proprietary device; includes an adapter to support any 510-threaded tank or atomizer. The airflow collar is removable to conserve size and weight when using a 510 attachment.
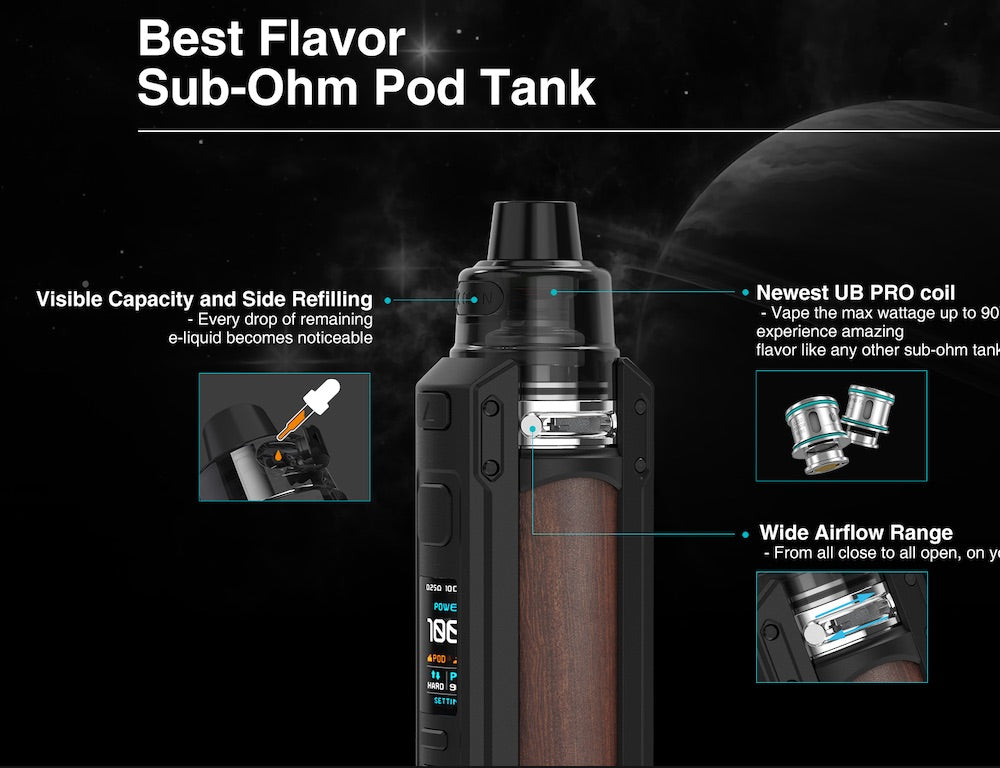
- The pod has a side opening, so you can fill it without removing it from the device.
- Supports USB-C charging; charges at about double the rate of previous-generation vaping devices.
- Supports two different pods – the Ursa pod and the Ursa Pro pod – to provide a wide variety of vaping experiences. The kit includes both types of pods.
- With its fully adjustable airflow and wide variety of available pods, the Ursa Quest has no difficulty supporting both direct-to-lung and mouth-to-lung inhaling.
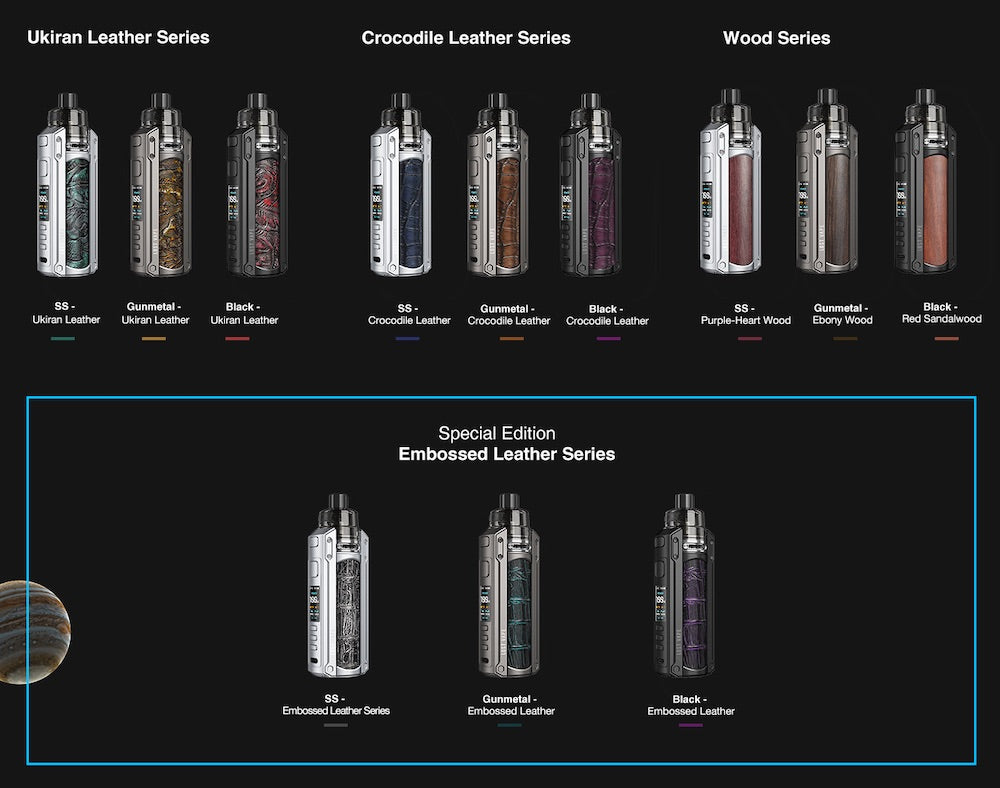
- The Ursa Quest is a true luxury vaping device with a wide variety of trim options including ukiran leather, crocodile skin and solid wood paneling. The trim is designed to acquire a unique patina over time, thus making each Ursa Quest a unique work of art.
What Coils Are Available for the Lost Vape Ursa Quest?
One of the greatest things about the Lost Vape Ursa Quest is the fact that its coil selection enables a wide variety of different vaping experiences. If you prefer to use a lower-nicotine e-liquid and chase clouds, you’ll want to use this device with Lost Vape UB Pro coils. However, the Ursa Pro also works with the smaller Lost Vape UB coils if you’d rather have a more refined, higher-nicotine vaping experience. Here’s the full selection of coils available for the Lost Vape Ursa Quest at the time of writing.
Lost Vape UB Pro Coils (Compatible With Ursa Pro Pod)
- UB Pro P1 Coil: Single 0.15-ohm mesh coil with a suggested power range of 70-90 watts.
- UB Pro P3 Coil: Single 0.30-ohm mesh coil with a suggested power range of 60-70 watts. Stainless steel material also works in temperature control mode.
- UB Pro RBA Deck: Allows you to build your own coils within a resistance range of 0.15-3.0 ohm. Large build platform allows for elaborate coil designs.
Lost Vape UB Coils (Compatible With Ursa Pod)
- UB M1 Coil: Single 0.30-ohm mesh coil with a suggested power range of 30-40 watts.
- UB M2 Coil: Single 0.60-ohm mesh coil with a suggested power range of 20-28 watts.
- UB M3 Coil: Single 0.15-ohm mesh coil with a suggested power range of 40-70 watts.
- UB M4 Coil: Single 0.20-ohm mesh coil with a suggested power range of 40-60 watts.
- UB MTL Coil: Traditional 1.0-ohm wound coil with a suggested power range of 8-15 watts. Designed for mouth-to-lung inhaling.
- UB RBA Deck: Allows you to build your own coils within a resistance range of 0.15-3.0 ohm. Intended for smaller coil designs.
In addition to the coil selection listed above, don’t forget that the Lost Vape Ursa Quest is not a proprietary device. Using the included 510-thread adapter, you can use this device with any sub-ohm tank or atomizer you like.
How to Use the Lost Vape Ursa Quest
This is the section of our Lost Vape Ursa Quest instruction manual that you’ve been waiting for. When you’ve just received a new vape mod, we know that it’s no fun to sit down and read the full printed manual before you’ve even had a chance to enjoy your new device. In this section of our guide, we’re going to give you a head start by explaining the four most important aspects of using the Lost Vape Ursa Quest. When you’re done reading, you’ll be ready to enjoy your new device right away and can read the printed manual after you’ve gotten the Ursa Quest up and running.
How to Charge the Lost Vape Ursa Quest
The Lost Vape Ursa Quest includes a USB-C charging cable – but because it uses a removable battery, it does not include the battery. If you don’t already own a 21700 or 20700 battery, you can also use the Ursa Quest with an 18650 battery. To install a battery, twist off the device’s bottom metal cap and insert the battery with the positive pole facing the top of the device. Replace the cap and connect the Ursa Quest to your computer using the USB-C cable. While the device charges, the screen displays an animated battery icon. When the icon is full, the device is fully charged.
How to Fill the Lost Vape Ursa Quest Pod
Thanks to the convenient side filling cap, you can fill the Lost Vape Ursa Quest pod without removing the pod from the device. Considering the enormous vapor production of this device, the fact that you can fill the pod without removing it is a major convenience feature. Place your fingernail under the silicone filling cover – labeled “OPEN” – on the side of the pod. Insert the top of your e-liquid bottle into the opening and squeeze the bottle until the pod is nearly full. Replace the filling cover. If this is your first time using the device, or you have just replaced the atomizer coil, let the device stand for at least five minutes before vaping to ensure that the cotton is fully saturated.
How to Change the Lost Vape Ursa Quest Coil
To replace the coil in the Lost Vape Ursa or Ursa Pro pod, you’ll need to remove the pod from the device. Since both pods use a push-fit coil replacement system, though, you can perform the coil replacement in a matter of seconds – and you can do it without getting e-liquid on your hands.
Begin by removing the pod from the Lost Vape Ursa Quest. Press and hold the release buttons on either side of the pod and lift the pod straight up to remove it. On the underside of the pod, you’ll see the bottom of the atomizer coil. Pull the coil out and push in a new coil until it’s seated fully. To replace the pod, push it straight down until the release buttons click.
How to Vape With the Lost Vape Ursa Quest
After you’ve charged the device and filled the pod, you’re ready to begin using the Lost Vape Ursa Quest. Start by pressing the fire button five times quickly to turn the device on. You’ll see the message “POWER” on the screen, indicating that the device is in the wattage-based vaping mode. Use the “-“ adjustment button to set the device to the bottom of the suggested wattage range for the atomizer coil you’re using. To vape, hold the fire button while puffing on the mouthpiece. Once you’ve broken in the atomizer coil, you can start increasing the wattage using the “+” button until you’re happy with the warmth and intensity of the vapor.