Have you bought your first disposable vape and found yourself unpleasantly surprised to see that it didn’t include an instruction manual? You’ll find the help you need right here. This article is a comprehensive guide on how to vape. We’re going to walk you through the entire process, starting from setting your device up for the first time. Whether you’re looking at your first vape and trying to figure out what to do with it or waiting for your device and want to know what you can expect when it arrives, we’re going to walk you through learning how to vape properly.
Because disposable vapes are the most popular vaping devices on the market today, that’s where our guide will begin. If you want to know how to use a refillable vape, scroll down to that section.
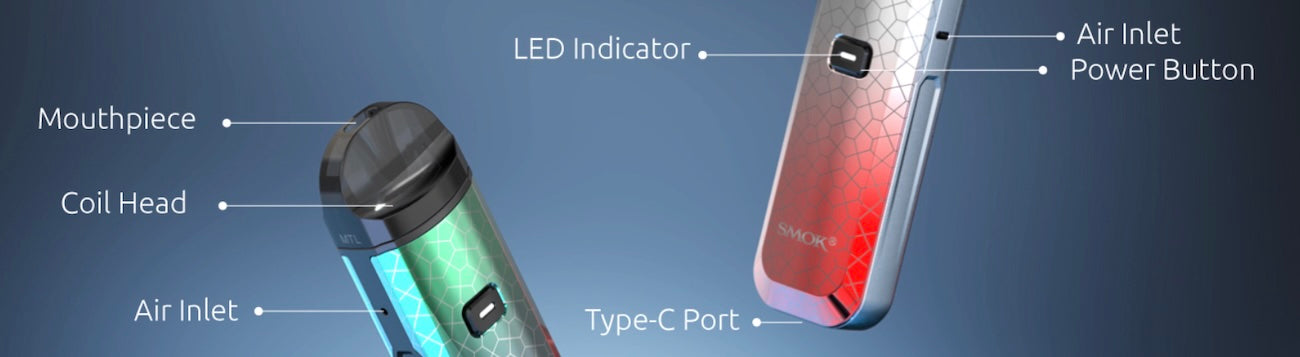
How to Use a Disposable Vape

Need help choosing? Read our list of the best disposable vapes.
Unboxing the Device
Before you can start using a disposable vape, you need to unbox it. Inside the box, you’ll find the device sealed in an airtight pouch for freshness. You can tear open the pouch and discard it, but your job doesn’t end there. You’ll also find a cap or plug to keep the mouthpiece sealed, and you may also find a strip of tape covering the airflow vent. You’ll need to remove those things before the device will work.
Does your vape have a switch on the bottom? In some popular vapes such as the Geek Bar Pulse, the airflow switch – which we’ll discuss in a moment – also turns the device on and off. If your vape has an on/off function, it won’t work until you’ve moved the switch.
Vaping
To use a disposable vape, all that you need to do is puff on it. Disposable vapes use automatic airflow sensors for activation, and your device will generate vapor immediately when you puff on it. It’ll feel very similar to smoking.
The most important aspect of learning how to vape is understanding how to inhale properly. Most disposable vapes are intended for mouth-to-lung hits, which means that you draw the vapor into your mouth before inhaling it. That’s the same inhaling style that you’d use with a cigarette.
Some vapers, however, prefer the direct-to-lung inhaling style. This means that you inhale the vapor directly into your lungs without pausing to hold it in your mouth. This inhaling style is generally more popular with low-nicotine vapes, but you should try both styles and see which one you prefer.
Changing the Settings and Airflow
Your disposable vape may have adjustable settings. That’s become very common with today’s high-capacity vapes, which often have dual-coil configurations and offer modes with names like “Pulse” or “Turbo” for people who want bigger clouds.
If your vape has multiple settings, you can change the mode in one of two ways depending on the design.
- You can press a button on the bottom or side of the device.
- You can move a switch on the bottom of the device. In some cases, the switch changes the mode and simultaneously adjusts the airflow. In other cases, a vape will have both a button and a switch, allowing you to adjust the vaping mode and airflow independently of one another.
Whichever system your device uses for changing the mode, it’ll have a screen or indicator to let you know which mode is currently active.
Recharging the Device
Almost all modern disposable vapes have rechargeable batteries. Being rechargeable is what makes it possible for the device to last thousands of puffs as many current vapes do. Your vape will either have a screen with a battery meter, or it’ll have an indicator light. When the meter reaches the bottom – or the light starts to blink – it’s time to recharge your vape. Do that by plugging it into your computer’s USB port. Most disposable vapes have USB-C ports.
You may have noticed that your disposable vape didn’t come with a charging cable. It’s rare for disposable vapes to include charging cables because people expect the devices to be extremely inexpensive. You can use any high-quality cable that fits the charging port. A disposable vape usually takes a little under an hour to charge.
Knowing When Your Vape Is Done
Your disposable vape may have a screen with an e-liquid meter, but the screen isn’t intended to be an exact representation of how much e-liquid your device has left – it’s just a general guideline. When the meter hits the bottom, your device may still have quite a few puffs left, but you should plan to get a new vape soon.
A disposable vape is done when it starts to produce a bad or burnt flavor on every hit. This is an indication that the tank is completely dry.
How to Use a Refillable Vape

Need help choosing? Read our list of the best refillable vapes.
Putting the Device Together
Before you can start using a refillable vape, you’ll need to assemble, fill and charge it. It might sound like a lot of work – which is why so many people use disposable vapes – but you’ll be up and running in about a half hour or so. The benefit is that a refillable vape gives you total freedom to use whatever flavor and nicotine strength of vape juice you prefer.
To assemble a refillable vape, you’ll need to do one of these things depending on the type of vape you’re using.
- Drop a pod into the chamber at the top of the device.
- Screw the tank into the threading at the top of the device.
If you’re using a pod vape, it’s possible that the first pod is already installed in the device. If this is the case, remove the pod and check for a sticker on the underside. Remove the sticker and discard it.
Filling the Device
You should fill your vape right away after assembling it. It takes a little time for vape juice to absorb into a new atomizer coil – so if you fill your device before charging it, you can be certain that the coil is completely saturated when you’re ready to start vaping.
- If you’re using a pod vape, you’ll probably find a silicone stopper on the side. Open the stopper and add vape juice until the pod is almost full. If the pod doesn’t have a stopper, the mouthpiece comes off. Wiggle the mouthpiece gently and pull it up to remove it.
- If you’re using a vape with a glass tank, the tank’s lid most likely swivels or twists to open. It may also have a release button. You can find the specific opening method for your tank in the instruction manual.
Don’t forget that you should never use a new pod or coil until the e-liquid has had at least five minutes to absorb. If you begin vaping too soon while the coil is still partially dry, you’ll experience a very harsh “dry hit.”
Charging the Device
To charge a refillable vape, connect it to your computer with the included charging cable. How long a vape takes to charge depends on its battery capacity, and charging the device will take anywhere from about 30 minutes to two hours. Your vape will have a screen or indicator light to let you know when the battery is fully charged.
Turning the Device On and Off
You’ll need to turn your vape on before you can start using it. When the vape is on, the screen or light will illuminate to let you know that you can begin vaping.
- If you’re using a pod system or vape pen without a button, it turns on automatically when a pod or cartridge is connected.
- If you’re using a vape with a button, press the button five times to turn the device on and off.
Vaping
Many refillable vapes use automatic puff-based firing like disposable vapes, but some have manual fire buttons. Here’s how to vape with both types of devices.
- If your vape doesn’t have a fire button, it activates automatically when you puff on it. Just puff on the device as if you were smoking a cigarette, and it’ll generate vapor immediately.
- If your vape does have a fire button, hold the button before taking a puff.
Some vapes support both automatic and manual firing. If your vape has this feature, you can vape with or without using the fire button. This might be a good feature if you’re learning how to vape and don’t know what your preferred firing style is yet.
Changing the Settings
Depending on its complexity, a refillable vape may have multiple settings that you can adjust. Although you’ll need to read the manual to see what settings are available for adjustment, we’ll provide an overview to help you get a feel for things.
- If your vape has adjustable airflow, you can change the airflow by moving a slider on the side of the device if it’s a pod system or by twisting the base of the tank if it’s a vape mod with a glass tank.
- If your vape has adjustable wattage, it’ll probably have “+” and “-“ buttons that you can use to increase or decrease the power.
- If your vape has a screen, it may have a menu system. You can usually open the menu by pressing the fire button two or three times. Once in the menu, you can use the “+” and “-“ buttons to move the cursor. Press the fire button to confirm your selection.
Replacing the Pod or Coil
When you notice a burnt flavor, it’s time to replace the pod or coil. Here’s how to do it.
- If you’re using a pod system with built-in coils, you’ll get a new coil when you replace the pod. Simply discard the pod that you’re using and replace it with a new one.
- If you’re using a pod system with replaceable coils, find the base of the coil on the underside of the pod and pull it straight out. Push the new coil in.
- If you’re using a vape mod with a glass tank, you’ll need to unscrew the bottom of the tank to access the coil. You’ll find the coil connected to the tank’s base or inserted into a chamber in the middle of the tank. Remove the old coil by pulling or unscrewing it and install the new coil in the same fashion.
As we mentioned above, it is extremely important to wait several minutes before vaping every time you install a new pod or coil because it takes time for the e-liquid to absorb into the coil’s cotton wick.